
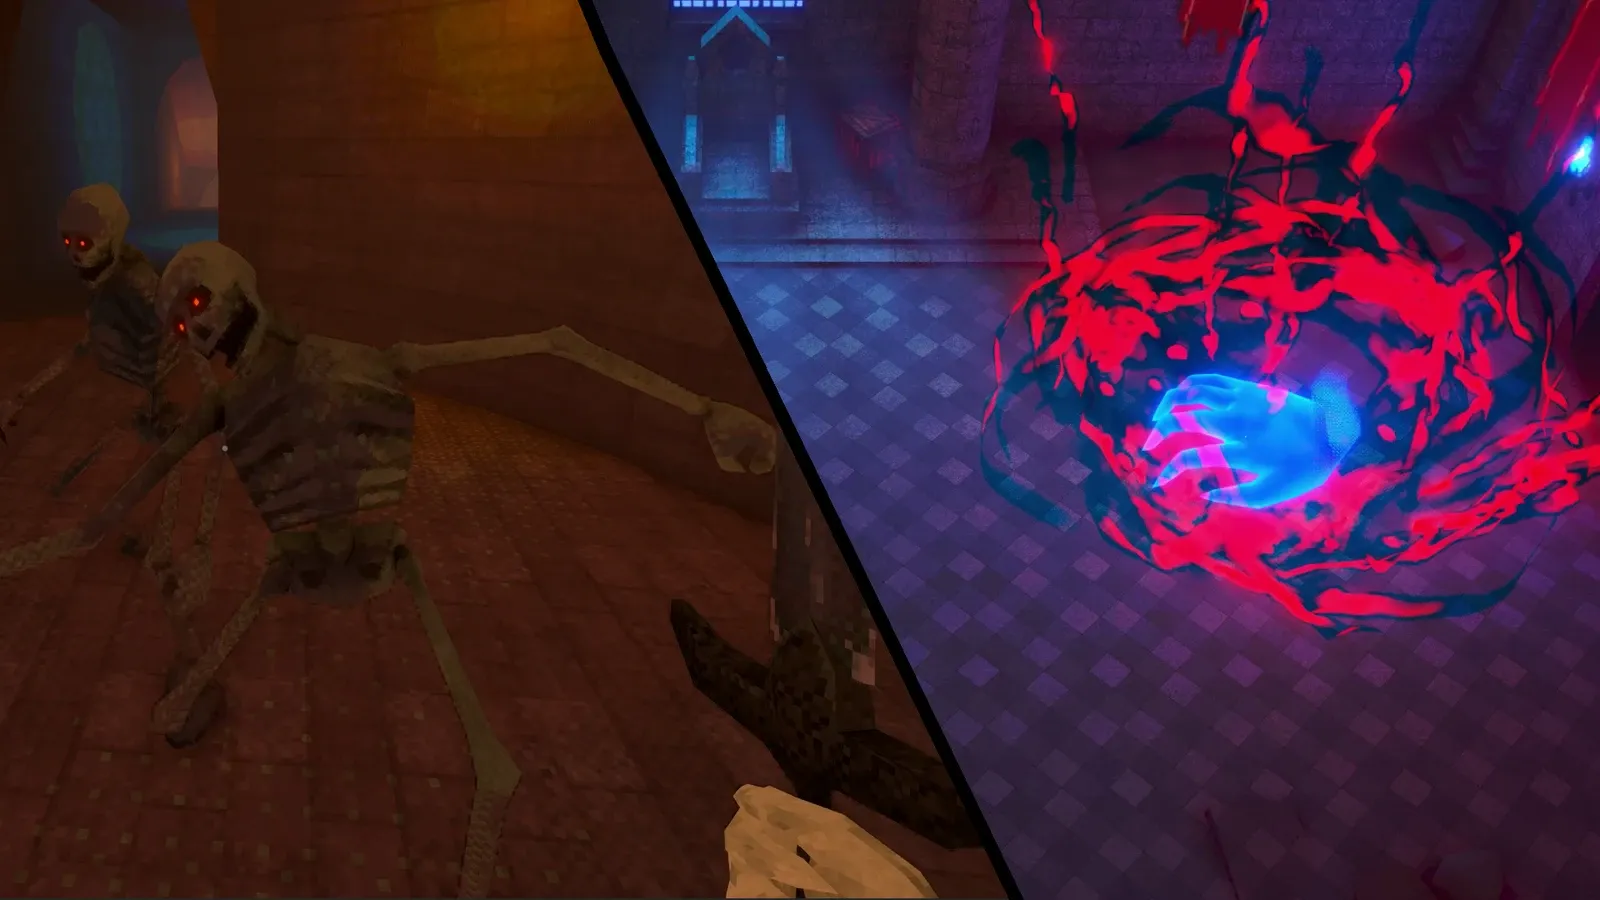
Cubilete’s look didn’t start with Cubilete. It came from Gamba, a prototype I was building before it: cramped spaces, fog, saturated colored lights, and dithering smeared over everything. Gamba got too big for one person, which happens, but the rendering work was the part I didn’t want to throw away.
So when Cubilete started I dragged the whole thing over. It’s now a shader called LoFi, one URP uber shader with a custom HLSL lighting integration, per channel posterization, texture based dithering, and a pile of keyword variants for grass, foliage, billboards and vertex animation.
Things get added, simplified, or ripped back out as Cubilete’s production evolves.
The original visual target

Gamba wanted a few things stock URP shaders don’t give you. Light falloff in visible bands instead of a smooth gradient. Dithering baked into the shading itself rather than a post effect sitting on top of a normal frame. Something that works on whatever geometry I throw at it, because hand authoring the look per asset was never going to happen with one person. And all of it, the saturated point lights, the fog, the shadows, had to look like it belonged to the same image.
I wasn’t trying to emulate a specific console or an actual historical pipeline. I wanted the vocabulary: few colors, visible patterns, light that jumps instead of sliding. But still art directable, because “authentic” is worthless if I can’t make a scene read.
The test scene was deliberately dumb. Checkerboards, primitives, a reflective sphere, and light colors picked to clash. Easy to see what held up and what fell apart.
A test room only tells you so much though. This is the same treatment in an actual Gamba combat scene, where lighting reacts across geometry that wasn’t authored for it:
Hybrid Shader Graph and HLSL workflow
LoFi is a hybrid. Shader Graph owns the material graph and the knobs I tune every day, custom HLSL owns the lighting evaluation.
I could write the whole thing in HLSL and have total control, but then every small material tweak turns into a code edit. Keeping the material facing half in Shader Graph lets me see the relationships, expose parameters, and keep the controls understandable for potential collaborators and future me.
Roughly:
- Shadergraph material controls
- Custom HLSL access to URP light data
- Simple Lambert light evaluation
- Texel snapped sampling
- Posterization and texture based dithering
- Optional material and vertex features

Taking control of URP lighting
Shader Graph’s built in lighting nodes don’t hand you per light data in a form you can
actually work with, so GetLightData goes and gets it: main light, baked GI, shadows,
additional lights, reflections, then feeds the parts I care about into LoFi’s lighting and stylization path.
It’s mostly plumbing. The point of it is that the stylized pass reacts to the same real scene lights everything else uses, instead of me maintaining some parallel fake lighting rig on the side.
void GetLightData_float(float3 WorldPos, float3 Normal, float3 ViewDir, float2 NormalizedScreenSpaceUV, float Roughness, float2 UV1, float3 BakedGI, out float3 Lighting, out float3 DirectionalLighting, out float3 Color, out float Distance, out float Shadow, out float3 Direction, out float3 Reflection)
{
    Lighting = 0;

    #ifdef SHADERGRAPH_PREVIEW

        float3 LightDirection = half3(0.5, 0.5, 0);
        float3 LightColor = 1;
        float DistanceAtten = 1;
        float ShadowAtten = 1;

        float d = saturate(dot(Normal, LightDirection));
        DirectionalLighting = LightColor * DistanceAtten * ShadowAtten * d + BakedGI;

        Color = LightColor;
        Distance = DistanceAtten;
        Shadow = ShadowAtten;
        Direction = LightDirection;
        Reflection = 0;

    #else

        float4 shadowCoord = TransformWorldToShadowCoord(WorldPos);

        float2 lightmapUV = 0;
        #if defined(LIGHTMAP_ON)
            OUTPUT_LIGHTMAP_UV(UV1, unity_LightmapST, lightmapUV);
        #endif
        half4 Shadowmask = SAMPLE_SHADOWMASK(lightmapUV);

        Light mainLight = GetMainLight(shadowCoord, WorldPos, Shadowmask);

        half3 bakedGI = BakedGI;
        MixRealtimeAndBakedGI(mainLight, Normal, bakedGI);

        DirectionalLighting = bakedGI + EvaluateLight(mainLight, Normal);

        Color = mainLight.color;
        Distance = mainLight.distanceAttenuation;
        Shadow = mainLight.shadowAttenuation;
        Direction = mainLight.direction;

        #if defined(_ADDITIONAL_LIGHTS)

            InputData inputData = (InputData)0;
            inputData.positionWS = WorldPos;
            inputData.normalizedScreenSpaceUV = NormalizedScreenSpaceUV;

            #ifdef _LIGHT_LAYERS
                uint meshRenderingLayers = GetMeshRenderingLayer();
            #endif

            #if USE_CLUSTER_LIGHT_LOOP
                for (uint lightIndex = 0; lightIndex < min(URP_FP_DIRECTIONAL_LIGHTS_COUNT, MAX_VISIBLE_LIGHTS); lightIndex++)
                {
                    CLUSTER_LIGHT_LOOP_SUBTRACTIVE_LIGHT_CHECK

                    Light light = GetAdditionalLight(lightIndex, WorldPos, Shadowmask);
                    #ifdef _LIGHT_LAYERS
                        if (IsMatchingLightLayer(light.layerMask, meshRenderingLayers))
                    #endif
                    {
                        Lighting += EvaluateLight(light, Normal);
                    }
                }
            #endif

            uint pixelLightCount = GetAdditionalLightsCount();

            LIGHT_LOOP_BEGIN(pixelLightCount)
                Light light = GetAdditionalLight(lightIndex, WorldPos, Shadowmask);
                #ifdef _LIGHT_LAYERS
                    if (IsMatchingLightLayer(light.layerMask, meshRenderingLayers))
                #endif
                {
                    Lighting += EvaluateLight(light, Normal);
                }
            LIGHT_LOOP_END

        #endif

        float fresnel = sqrt(1.0 - saturate(dot(Normal, ViewDir)));
        Reflection = GetCubemap(ViewDir, WorldPos, Normal, NormalizedScreenSpaceUV, Roughness) * fresnel * (1 - Roughness);

    #endif // SHADERGRAPH_PREVIEW
}
Snapping light response to texture texels
Smooth lighting sliding over a deliberately chunky texture looks wrong. The texture is obviously made of squares and the light isn’t, so they read as two separate things stacked on top of each other. The fix is texel snapping: push the world position used for lighting to the center of the nearest texel.
I adapted this from the Unity forum thread The Quest for Efficient Per-Texel Lighting. The derivatives give you a chain between texture space, fragment space and world space, so the lighting sample can hop along the texture grid instead of sliding across it.
void TexelSnap_float(float3 WorldPos, float4 UV0, float4 TexelSize, out float3 SnappedWorldPos)
{
    // 1.) Calculate how much the texture UV coords need to
    //     shift to be at the center of the nearest texel.
    float2 originalUV = UV0.xy;
    float2 centerUV = floor(originalUV * (TexelSize.zw))/TexelSize.zw + (TexelSize.xy/2.0);
    float2 dUV = (centerUV - originalUV);

    // 2b.) Calculate how much the texture coords vary over fragment space.
    //      This essentially defines a 2x2 matrix that gets
    //      texture space (UV) deltas from fragment space (ST) deltas
    // Note: I call fragment space "ST" to disambiguate from world space "XY".
    float2 dUVdS = ddx( originalUV );
    float2 dUVdT = ddy( originalUV );

    // 2c.) Invert the texture delta from fragment delta matrix
    float2x2 dSTdUV = float2x2(dUVdT[1], -dUVdT[0], -dUVdS[1], dUVdS[0])*(1.0f/(dUVdS[0]*dUVdT[1]-dUVdT[0]*dUVdS[1]));

    // 2d.) Convert the texture delta to fragment delta
    float2 dST = mul(dSTdUV , dUV);

    // 2e.) Calculate how much the world coords vary over fragment space.
    float3 dXYZdS = ddx(WorldPos);
    float3 dXYZdT = ddy(WorldPos);

    // 2f.) Finally, convert our fragment space delta to a world space delta
    // And be sure to clamp it in case the derivative calc went insane
    float3 dXYZ = dXYZdS * dST[0] + dXYZdT * dST[1];
    dXYZ = clamp (dXYZ, -1, 1);

    // 3a.) Transform the snapped UV back to world space
    SnappedWorldPos = (WorldPos + dXYZ);
}Off, the light glides over the surface smoothly, ignoring the texel grid. On, it steps with the texels. Lowering shadow resolution wouldn’t cause the same effect: the shadow would get chunkier, but it still wouldn’t line up with the texels. Small difference in motion, but the surface stops feeling like two layers.
Posterizing per channel without killing the color
Plain posterization crushes the number of values, which is the point, but treating all three channels the same way wrecks saturated colors. A strongly red surface loses the channel that made it red in the first place.
LoFi posterizes R, G and B separately, then checks how much each channel contributed to the input. If one dominates, I can pull back a configurable amount of its original value.
This isn’t about faithfully preserving the source. It’s a knob: strict banding where I want the limited palette to bite, dominant color preserved where the strict version just looks muddy.
void ChannelAwarePosterize_float(float3 inColor, float3 Steps, float3 RGBPreservation, float PreservationThreshold, out float3 OutColor)
{
    half3 posterized = inColor;
    if (Steps.r > 0) posterized.r = floor(inColor.r * Steps.r) / Steps.r;
    if (Steps.g > 0) posterized.g = floor(inColor.g * Steps.g) / Steps.g;
    if (Steps.b > 0) posterized.b = floor(inColor.b * Steps.b) / Steps.b;

    half sum = inColor.r + inColor.g + inColor.b;
    half3 channelRatio = (sum > 0.001) ? inColor.rgb / sum : half3(0.33, 0.33, 0.33);

    half3 isChannelDominant;
    isChannelDominant.r = channelRatio.r > PreservationThreshold ? 1 : 0;
    isChannelDominant.g = channelRatio.g > PreservationThreshold ? 1 : 0;
    isChannelDominant.b = channelRatio.b > PreservationThreshold ? 1 : 0;

    half3 result = posterized;

    result.r = lerp(posterized.r, inColor.r, isChannelDominant.r * RGBPreservation.r);
    result.g = lerp(posterized.g, inColor.g, isChannelDominant.g * RGBPreservation.g);
    result.b = lerp(posterized.b, inColor.b, isChannelDominant.b * RGBPreservation.b);

    OutColor = result;
}Dithering as part of the material
I didn’t want dithering that behaves like a filter slapped over a normal frame. LoFi applies the pattern as part of the material and lighting response.
That matters because the effect gets at the values that produced the surface, not just the final pixel. Practically it also means I can tune it per material, or turn it off when a surface needs to lean more on texture detail than on pattern.
And the pattern is meant to be seen, the approximation is the look.
From experiment to a production shader
Same foundation, very different jobs.
Gamba wanted dark rooms, fog, tight corridors and dramatic pools of colored light. It could afford to be moody at the expense of clarity. Cubilete can’t. It’s a mechanically dense game and at any moment you’ve got dice, faces, targeting states, enemies, effects and UI feedback all competing for your eyes.
So it wasn’t a copy paste. I kept the parts that still worked and kept changing the rest.
| Gamba prototype | Cubilete production |
|---|---|
| Dark, oppressive spaces | Readable combat presentation |
| Aggressive saturated lighting | Controlled separation between gameplay elements |
| Shader as visual exploration | Shader as a maintained production tool |
| Narrow prototype requirements | Materials for characters, props, grass, foliage, and billboards |
Easier to see it than read it. Gamba, dungeon combat, everything cranked toward mood:
And here is the same shader family in a Cubilete production scene, combining the base material response with animated local lighting, fog, and layered summon effects:
One shader, optional production features
LoFi is the uber shader for Cubilete now. The shared material and lighting behavior stays the same everywhere, and keyword controlled features handle whatever a specific surface needs on top.
What it covers right now:
- Standard props and environment surfaces
- Grass and foliage
- Camera facing billboards
- Vertex animation
- Material specific posterization and dithering controls
Keywords are a tradeoff and I go back and forth on it. Material authoring stays consistent and disabled features cost nothing at runtime, but every combination is another potential variant, and variant counts have a way of getting away from you.
Which is why a new feature doesn’t automatically earn a spot in the shared shader. It goes in when it solves something that keeps coming up, the exposed controls stay narrow, and it comes back out when maintaining it stops being worth it.
What changed in production
If there’s one thing carrying LoFi into Cubilete taught me, it’s not to protect the tech from the game. Some of the experiments turned into features I rely on. Others were great in isolation and actively bad in the actual game: harder to read, annoying to author against, or spawning more variants than they were worth. Those got retuned or deleted. It stings a bit when it’s something you spent a weekend on.
That still happens. Cubilete keeps surfacing rendering problems I hadn’t thought about, and LoFi keeps moving to meet them. I’d rather have that than a “finished” shader I’m afraid to touch.
Closing thoughts
Prototype work isn’t automatically wasted. Gamba never became a game, but the rendering work came out of it intact and separable from the scope that killed it. That alone made it worth doing.
The thing I’d tell past me is that a look surviving a test scene means very little. What matters is whether it holds up across a growing set of production assets, real scene lights, and gameplay requirements that change under you every month, and whether other people (or future you) can author against it without a manual. Readability wins over attachment. If an effect looks incredible and makes the game harder to read, it changes or it goes.
LoFi started as me trying to find a visual identity for one prototype. Its actual job now is helping a different game hold onto its identity while it grows, which is a less romantic role but a more useful one.
If this was informative, I hope it was, and if you are curious about the game, Cubilete is on Steam and wishlists genuinely help a solo dev out.